:format(webp))
Building Scalable Web3 Frontends with Next.js: Speed, SEO, and Innovative Patterns

By the end of this guide, you’ll understand why Next.js is a leading choice for Web3 frontends, how to set up a project with wallet integration and smart contract interactions, and discover advanced patterns—like on-chain access control and token-gated routing—that go beyond common tutorials.
Why Next.js Is Ideal for Web3 Frontends
Next.js combines React’s flexibility with powerful rendering modes, making it perfect for applications that need fast load times, search visibility, and the ability to grow.
Speed
Server-side rendering (SSR) and static generation deliver pre-rendered HTML, cutting down time-to-first-byte and improving perceived performance, as detailed in the web.dev guide to rendering on the web .
SEO Friendliness
Pre-rendering ensures crawlers see fully formed pages, boosting discoverability according to Google Search Central’s crawling and indexing documentation .
Scalability
Incremental Static Regeneration (ISR) lets you update static pages after build time without a full rebuild, as explained in Vercel’s ISR announcement .
Rendering Modes at a Glance
Mode | Description |
|---|---|
SSR | Fetch data on each request and return rendered HTML. |
SSG | Generate HTML at build time for routes that don’t change often. |
ISR | Regenerate static pages in the background when traffic comes in. |
SSR (Server-side Rendering)
Fetch data on each request and return rendered HTML.
SSG (Static Site Generation)
Generate HTML at build time for routes that don’t change often.
ISR (Incremental Static Regeneration)
Regenerate static pages in the background when traffic comes in, keeping content fresh.
Setting Up Your Next.js Web3 Project
Create a new Next.js app:
npx create-next-app@latest my-web3-app

cd my-web3-app
Install Web3 libraries:
npm install ethers web3Configure environment variables in `.env.local`:
NEXTPUBLICRPCURL=https://mainnet.infura.io/v3/YOURPROJECT_IDAdd an API route for server-side RPC calls (`/pages/api/rpc.js`) to hide your API key.
Integrating Wallets and Smart Contracts
With ethers.js, connecting wallets and interacting with contracts becomes straightforward—see the ethers.js GitHub repository for detailed examples.
import { ethers } from 'ethers';


async function connectWallet() {

if (!window.ethereum) throw new Error('No crypto wallet found');

await window.ethereum.request({ method: 'eth_requestAccounts' });

const provider = new ethers.providers.Web3Provider(window.ethereum);

return provider.getSigner();

}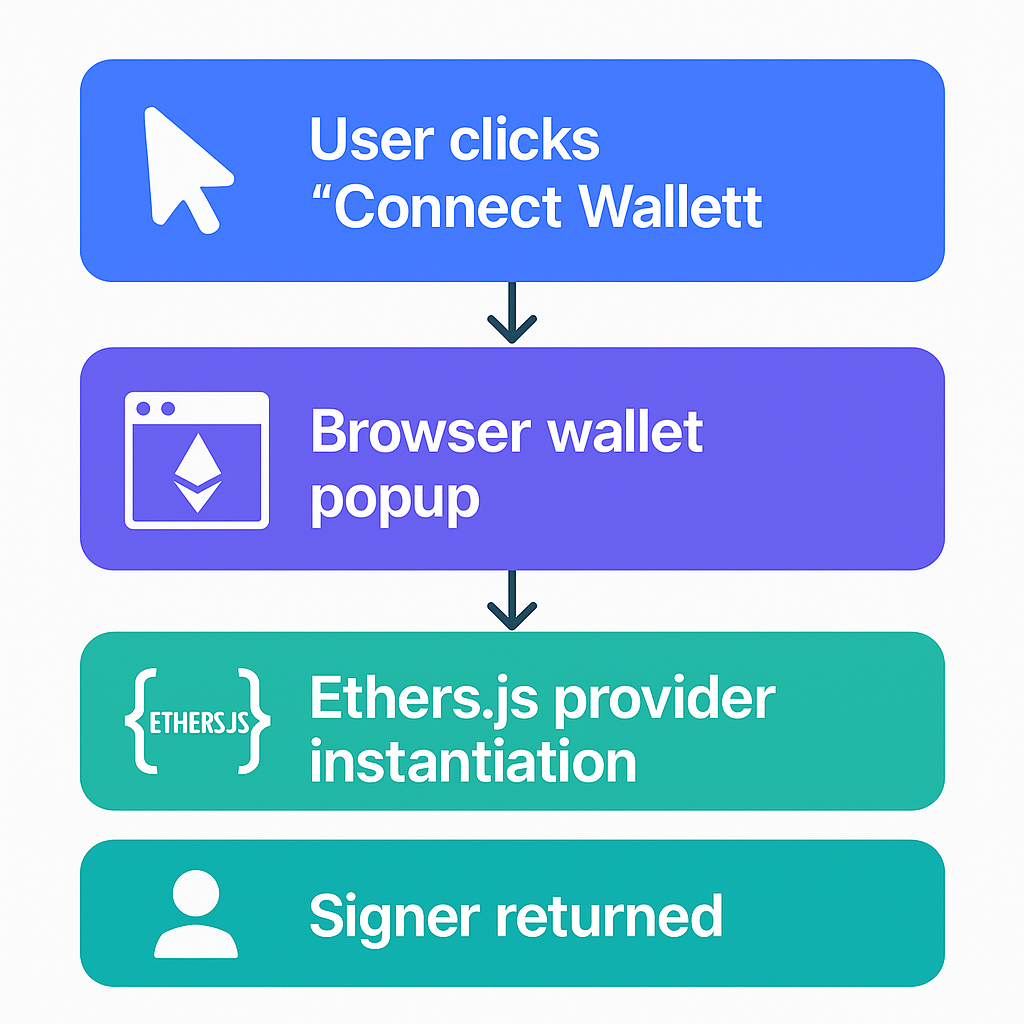
Key steps:
Request account access (`eth_requestAccounts`)
Create a provider and signer
Call contract methods:
const contract = new ethers.Contract(address, abi, signer);

const balance = await contract.balanceOf(address);
Advanced Patterns for Dynamic Web3 Experiences
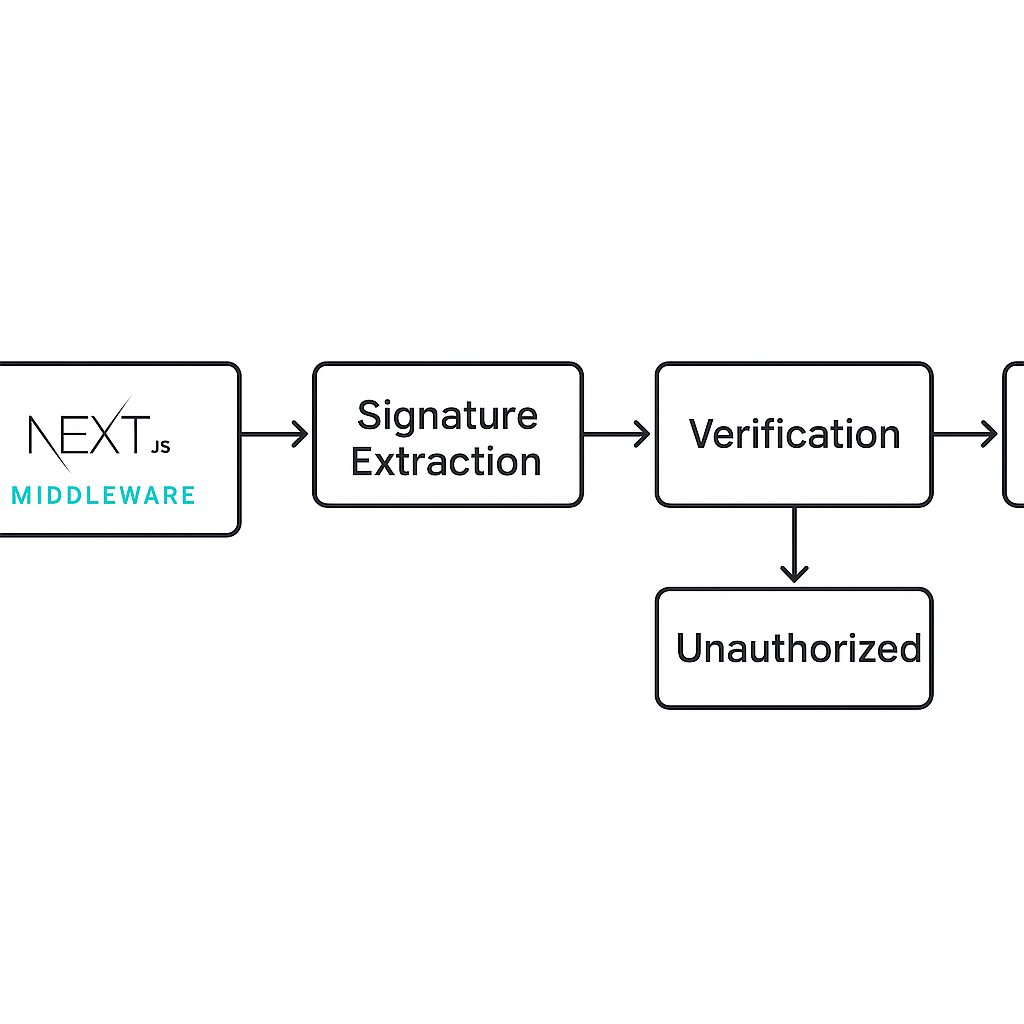
Using Next.js Middleware for On-Chain Access Control
Next.js middleware runs before a request is completed. You can verify wallet signatures or on-chain roles here:
// middleware.js

import { verifyMessage } from 'ethers/lib/utils';


export async function middleware(request) {

const sig = request.headers.get('x-signature');

const msg = 'Access protected';

const signer = verifyMessage(msg, sig);

if (!allowedAddresses.includes(signer)) {

return new Response('Unauthorized', { status: 401 });

}

}
Dynamic Routing for Token-Gated Content
Protect pages based on NFT ownership:
// pages/[token]/index.js

export async function getServerSideProps({ params }) {

const { token } = params;

const hasAccess = await checkTokenOwnership(token, userAddress);

if (!hasAccess) return { notFound: true };

return { props: { token } };

}
Leveraging ISR with Blockchain Data
When on-chain data updates frequently, ISR lets you balance freshness and performance:
export async function getStaticProps() {

const data = await fetchOnChainData();

return {

props: { data },

revalidate: 10, // regenerate every 10 seconds

};

}
Statistic: Next.js sees over 30 million weekly downloads on npm .
Integrating Real-Time Blockchain Event Listeners
Subscribe to smart contract events and push updates to the UI:
useEffect(() => {

contract.on('Transfer', (from, to, amount) => {

setTransfers(prev => [...prev, { from, to, amount }]);

});

return () => contract.removeAllListeners();

}, [contract]);
Learn more about listening to events in ethers.js in the official ethers.js documentation on event handling .
Handling Blockchain Network Latency and Error States
During SSR or SSG, RPC calls can time out or fail. Wrap fetches with timeouts and fallbacks:
async function fetchWithTimeout(url, options) {

const controller = new AbortController();

setTimeout(() => controller.abort(), 5000);

return fetch(url, { ...options, signal: controller.signal });

}
Retry on failures
Show user-friendly messages
Fallback to cached data
SEO and Performance Optimization
Use `<Head>` to set meta tags and Open Graph data.
Optimize images with `next/image` for automatic resizing.
Cache API routes on Vercel or your platform of choice.
Analyze bundle size with `next build --profile`.
Scaling and Deployment
Deploy on Vercel for zero-configuration SSL, edge caching, and global CDN.
Use Vercel’s Analytics to track performance metrics.
For larger teams, enable Preview Deployments for every PR.
Next Steps and Beyond
You now have a roadmap to build a production-quality Web3 frontend with Next.js. Start by forking a starter kit (e.g., Alchemy’s Next.js SDK guide ), integrate the advanced patterns you learned here, and deploy on Vercel or your preferred host. Dive into the docs, experiment with real-time data, and keep iterating—your users will appreciate the speed, reliability, and seamless blockchain interactions.
:format(webp))
:format(webp))
:format(webp))